One of my absolute favorite things to grow from seed are onions! I seed a full tray of them every February and harvest big onions in mid July. It gets my hands in some soil in the winter and is a very rewarding crop to harvest and eat throughout the following winter! Here is a photo essay of the steps I do. Give onions a try!

Step 1- Gather your materials. I use our Organic Mechanics Seed Starting Blend, CowPots, a tray, a humidity dome, a heat mat and a T5 growlight. A sunny window on the south side of your home works too, but the light really helps!


Step 2- Place the CowPots in the tray and fill with soil. Three 6 packs plus a 1/2 of a CowPot pack fit perfectly in a 10"x20" tray. Fill soil to the top of the CowPot and tamp down a bit.


Step 3- Onion seeds are pretty tiny! There were 21 CowPots to fill so I divided the number of seeds by 21 and ended up sowing 7-8 seeds per square. Take your time and try to give them room to sprout with a little space between each other. Can you see them above on top of the soil?


Step 4- Sprinkle a thin layer-1/8-1/4" of soil on top of the seeds and tamp down so the seeds have good contact with the soil.


Step 5- Place the tray on the heatmat. Pour water into the tray, I added about a 1/4" layer of water which was soaked up in about 10 minutes. I also gently misted the top of the soil. A sprayer dedicated to just water seedlings is a great thing to have.


Step 6- Put the dome on the tray. Technically, you do not need a light on the tray until they start to germinate. Write down when you started the seeds for your records. I planted these just recently, February 14th, 2021. Last year I started them on February 27th. Early March is ok too!


Step 7- Watch and wait! The dome will fill with humidity and help germinate the seeds. This one has 2 air holes on the top that can be opened and closed. When I see this much humidity, I open them. The heat mat is on and warming the tray for germination. The little seedlings popped up in a few days and the picture on the right was taken 10 days after sowing! (Feb 24th, 2021) I will keep the dome on until most seeds have germinated, then take it off so the soil has fresh air. If you see some fungus growing on the soil or cowpots, it is ok! This is nature breaking down the turkey litter in the soil, or the manure in the cowpot. If you start to get too much growing on the soil, take the dome off for a few hours.
(The pictures below are now photos taken during the 2020 season)


Step 8- The seedlings are getting bigger so here I am watering from the bottom with a mixed solution of water and Sustane Flourish powder. The water looks brown, which is the Sustane organic fertilizer, note it is not synthetic and BLUE! The seedlings are getting taller and kind of flopping over, so it is time for a haircut!

Step 9- Trim the tops off the seedlings every time they get longer and floppy. Here is my freshly trimmed tray. This causes the onion plants to get stronger and you get a little handful of fresh onion green cutoffs to cook with! I usually do this 3-4 times before they are planted outside.


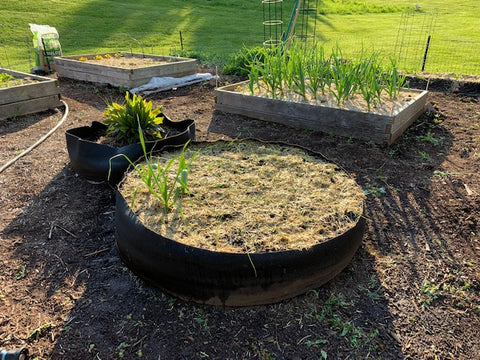
Step 10- It is now May and time to plant them outside. I plant the whole flat into a Smart Pot Big Bag Bed. This bed is 12" tall and 50" across and already has some garlic growing on one side. (and more garlic growing in the cedar bed behind this) The soil I filled this with the previous year was Coast of Maine Castine Blend Raised Bed Mix soil. Filling the beds with good quality organic soil is very important. It is an investment in future year's gardens too! As soil settles, I top dress each bed with 1 bag of Coast of Maine lobster compost before planting day.
You will need to plant each onion seedling separately, which means carefully teasing them apart and separating them into single onion plants. It really helps to water the tray before doing this. They separate fairly easily once you get the hang of it. They are tougher than you think! Go ahead and plant them all, spacing them about 6" from each other. You can plant them closer, but you will get smaller onions. Plant them so the roots are under the soil, and press lightly around to give them good soil contact and the seedling is standing up nicely. Sprinkle some organic granular fertilizer on the soil. I use granular Sustane 4-6-4.
Step 11- Layer on a 1" layer of Mainely Mulch and water deeply. Water a few times the first 2 weeks until roots are established. After that time, water once a week. Feed them granular Sustane 4-6-4 again in a month.
So now, they get growing and turn into this.......

Woo-hoo!
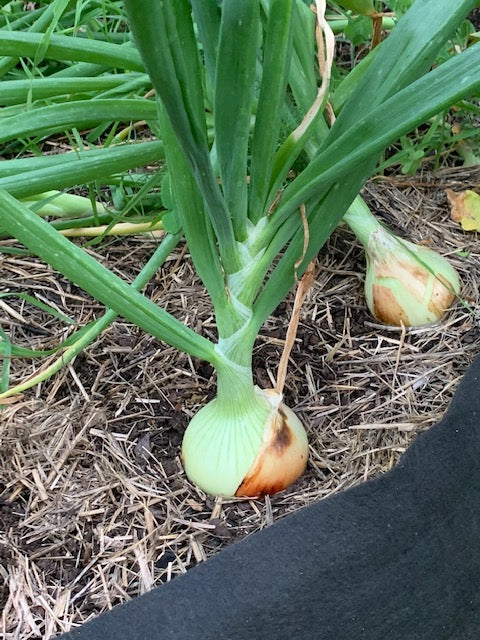
Step 12- Onions are ready to harvest when the green tops start to flop over and lay down on the soil a bit. The onion in this photo is not ready just yet. If you wanted to cook with one, you can definitely harvest it anytime and use it fresh! When the weather is hot and dry, water onions deeply 1-2 times each week and add a fresh layer of Mainely Mulch to keep soil from drying out if needed. Do not water daily, this keeps the roots growing at the surface. Water deeply and the roots grow DOWN, looking for the deep soaked water as the top layer of soil dries out.

Step 13- Here are the onions after harvesting in mid July, 2020. It has been a dry month-you can tell by the crispy lawn. I harvested them when the soil had dried out a bit and when they were due for a watering. Carefully lift out each onion bulb-lifting from underneath the soil. Chatty Cathy, our Black Australorp approved of our harvest! Next I laid them out in the garage on some hardware cloth until the tops turned brown and crunchy. This cures them for storage. When they were dry, I trimmed off the tops and the crispy roots and brought them inside to the basement to continue to cure and used them through January 2021!
Onions are a very fun, pretty low maintenance crop to grow. I am enjoying watching them every day and dreaming of summer! New this winter, I am going to winter sow some onions and may blog about those as well. One good thing about gardening is there is always something new to learn.
Natureworks has all the supplies you need at www.natureworksgardencenter.com!
Happy Gardening! -Diane
